Here is how to apply for PM Surya Ghar Yojana in short: register on the official portal, pmsuryaghar.gov.in, with the mobile number linked to your electricity connection. Then apply with your DISCOM consumer number, choose a registered vendor, get the system installed and inspected, and redeem the subsidy online. You can track every stage on the portal.
If you searched “PM Surya Ghar Yojana apply kaise kare”, this is the same process, written out step by step for homes in Noida and Greater Noida. ChhatSolar is an independent guide and cannot apply for you. Use only the official National Portal.
Last reviewed: 14 October 2026. The portal changes its screens and rules from time to time, so check the official site if anything looks different.
Before you start: what to keep ready
The portal’s FAQ says only bank documents are mandatory when you apply, but a little preparation avoids most rejections later.
| Item | Why you need it | Where to find it |
|---|---|---|
| Electricity consumer or account number | The portal fetches your connection details from it | Your NPCL or PVVNL bill |
| Mobile number registered with the DISCOM | Registration and login use OTPs sent to it | Your bill or DISCOM app |
| Bank account in the same name as the bill | The subsidy is paid here; a name mismatch blocks payment | Cancelled cheque or passbook copy |
| Sanctioned load | Your system usually cannot exceed it | Printed on your bill |
| Shade-free roof area | About 10 to 12 sq m is needed per kW | Measure your terrace |
On sizing: in UP, a rooftop system must not exceed 100% of your sanctioned load. MNRE’s March 2026 advisory suggests DISCOMs allow up to 10% extra panel (DC) capacity as long as the inverter stays within your sanctioned load. So where a DISCOM follows the advisory, a 3 kW connection can take six 540 W panels (3.24 kW) with a 3 kW inverter.
How to apply for PM Surya Ghar Yojana: the steps in order
The portal’s consumer application journey has ten stages. Here is what each one involves.
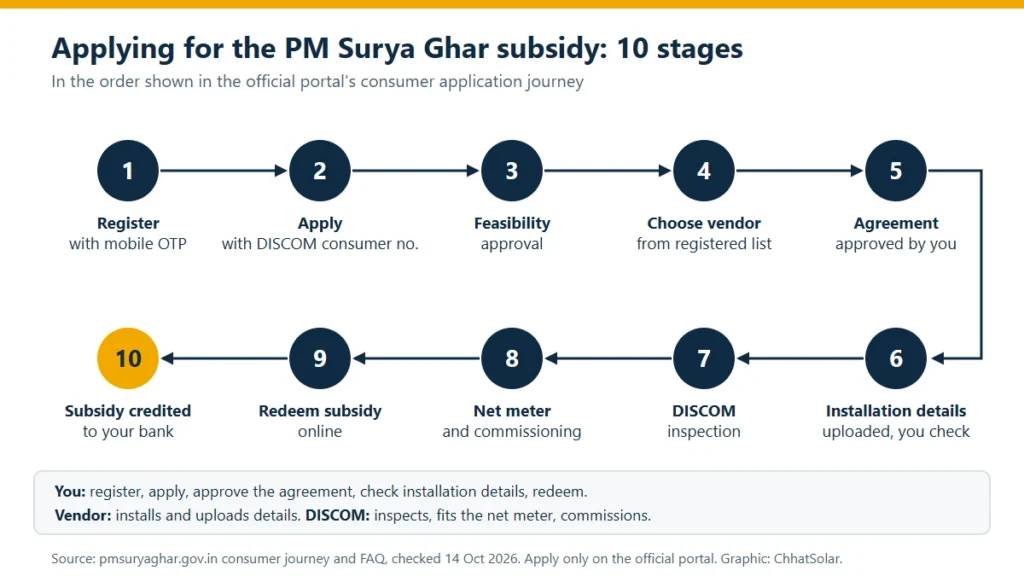
Step 1: Register on the portal (PM Surya Ghar registration)
Open pmsuryaghar.gov.in. Choose Consumer → Apply Now, or open the Login menu and pick Consumer Login. Enter the mobile number registered with your electricity connection and the captcha, tick the box saying you have read the scheme guidelines, and click Verify. Enter the OTP you receive by SMS and log in.
Step 2: Complete your profile
Fill in your name, email, address, state, district and PIN code, and save. Use your name exactly as it appears on the electricity bill.
Step 3: Submit the application
Click Apply for Solar Rooftop. Select Uttar Pradesh, your district and your DISCOM (NPCL for most of Greater Noida, PVVNL for most of Noida, but check your bill). Enter your consumer account number and click Fetch Details, then Next to complete and submit the form. You can let a vendor fill the application for you, but only if you shortlist that vendor and accept the arrangement from your own login.
Step 4: Feasibility approval
In UP, a complete application for a system of up to 10 kW is deemed accepted without a separate technical feasibility study, under a procedure approved by the state regulator, UPERC, in 2024. Larger systems get a feasibility study, which must be finished within 15 days.
Step 5: Choose a registered vendor (the PM Surya Ghar vendor list)
The portal’s registered vendors list shows the vendors registered for your DISCOM. You can shortlist several, contact them, compare quotes and then select one. Prices are agreed between you and the vendor; there is no government rate. Before choosing, check the portal’s list of deactivated vendors, and look at UPNEDA’s blacklisting notices for vendors in UP. You can change vendors only until the vendor uploads your work agreement.
Step 6: Approve the agreement, then work starts
The vendor uploads the vendor-consumer agreement with the total cost, including taxes and all charges. Since a notice dated 23 September 2026, you must approve that agreement in your consumer login before the vendor can upload installation details. Read the price, the panel and inverter brands, and the warranty terms before you click approve.
Step 7: Installation details
After installing the system, the vendor fills in the installation data and sends it to you. Check it, then either submit it to the DISCOM for inspection or send it back with comments. Geo-tagged photos of the plant and a DCR undertaking (confirming Indian-made cells and modules) are mandatory.
Step 8: DISCOM inspection
The DISCOM visits, inspects the system against a checklist and either approves it or sends it back for corrections.
Step 9: Net meter and commissioning
The DISCOM signs the metering agreement with you, installs or approves a two-way net meter and commissions the system. Our guide to net metering in UP explains what happens on your bill after this.
Step 10: Redeem and receive the subsidy
Once the DISCOM approves the installation, your e-token is activated with the subsidy for the capacity actually installed. Log in, confirm your bank details and redeem it. MNRE’s guidelines say the subsidy will be processed within 15 days of DISCOM approval. One recent change: since 3 September 2026, applications with a confidence score below 70% need a signed undertaking and a government name proof (such as Aadhaar or a Voter ID) before redemption.
For the amounts you can expect at the end of this process, see our PM Surya Ghar subsidy guide. In UP, the state subsidy follows separately.
PM Surya Ghar subsidy status check
To check where your application stands, log in on the portal with your registered mobile number and OTP and open your application. Each stage above appears as it is completed. Once the DISCOM finishes its inspection, the activated subsidy amount appears for redemption. If something is stuck, raise a complaint in the portal’s grievance section or call the toll-free number, 15555.
Paying for it: loans through the portal
You can start a loan application from inside the portal, which is linked to the Jan Samarth platform. The standard product listed under Consumer Financing Options looks like this:
| Feature | Loan up to ₹2 lakh | Loan above ₹2 lakh (up to ₹6 lakh) |
|---|---|---|
| Interest rate | RBI repo + 0.50% (shown as 6.00% p.a. on the portal) | Home-loan rate, or home-loan rate + 1% if you have no home loan |
| Your contribution (margin) | At least 10% | At least 20% |
| PAN and income proof | Not required | PAN, ITR or Form-16 for 2 years, net annual income of at least ₹3 lakh |
| Tenure and fees | Up to 120 months, 6-month moratorium, zero processing fee, no prepayment charge | |
The rate is floating, so check the current figure on the portal. Loans through the portal are for individual residential consumers, not RWAs. If you take one, the subsidy is credited to the loan account first.
Worked example: a Greater Noida application (illustrative)
To show how the choices fit together, take a hypothetical house in Greater Noida with an NPCL connection and a 3 kW sanctioned load:
- DISCOM selected: NPCL, as printed on the bill.
- System: six 540 W DCR panels (3.24 kW) with a 3 kW inverter, which fits the 10% DC tolerance in MNRE’s advisory.
- Roof check: 3 kW needs roughly 30 to 36 sq m of shade-free terrace.
- Subsidy at the end: ₹78,000 central CFA (capped at 3 kW, so the extra 0.24 kW adds nothing), plus up to ₹30,000 from UPNEDA if the state subsidy is still running.
For the price side of this example, see the 3 kW system price breakdown.
Mistakes to avoid
- Applying through a website or agent that only looks official. The National Portal is pmsuryaghar.gov.in.
- Approving an agreement without reading the total price and component brands.
- Letting installation start before the agreement is approved on the portal.
- Choosing panels without a DCR certificate.
- Ignoring upkeep after commissioning. Our solar panel maintenance guide covers what the vendor must do in the first five years.
Key takeaways
- Apply only on pmsuryaghar.gov.in, using the mobile number registered with your electricity connection.
- The journey has ten stages, from registration to subsidy disbursal, and you can track each one in your login.
- Pick a vendor from the portal’s registered list, and approve the agreement in your login before work starts.
- Keep your bank account name identical to your electricity bill name.
- Loans can be started from the portal, at a floating rate linked to the RBI repo rate for loans up to ₹2 lakh.
Frequently asked questions
Can I apply for PM Surya Ghar myself, or must the vendor do it?
You can apply yourself. A registered vendor can fill the application on your behalf only if you shortlist that vendor and accept the arrangement from your own login. Either way, the approvals stay with you.
What documents are needed for PM Surya Ghar registration?
Registration needs only your registered mobile number and electricity consumer number. For the application, only bank documents such as a cancelled cheque or passbook copy are mandatory, and the bank account name must match the electricity bill. Uploading the bill itself is optional.
Where can I find the PM Surya Ghar vendor list for Noida and Greater Noida?
On the official portal, under Consumer → Registered vendors, filtered by your state and DISCOM. The portal also publishes a list of deactivated vendors, and UPNEDA posts blacklisting notices for vendors in UP.
Can I change my vendor after applying?
Yes, but only before the vendor-consumer work agreement is uploaded on the portal. After that, the vendor is locked in for that application.
How long does it take to get the subsidy after installation?
MNRE’s guidelines say the central subsidy will be processed within 15 days of the DISCOM approving the installation. Actual times vary with inspection schedules and document checks. In UP, the state subsidy is released later, after the central payment.
PM Surya Ghar Yojana apply kaise kare?
Register on pmsuryaghar.gov.in with your registered mobile number, apply with your DISCOM consumer number, choose a registered vendor, approve the agreement in your login, and redeem the subsidy online after the DISCOM inspection. The ten stages above describe each step.
Sources: PM Surya Ghar National Portal (registration steps and notices); consumer application journey; portal FAQs; registered vendors; consumer financing options. All accessed 14 October 2026.